Last week I was lucky enough to be in California and visit fellow robot builder Brian Clark. Brian was building his B9 robot about the same time I was building mine. His sense of humor is great and his home was very interesting. In addition to having a life size Robby, Brian bought the Creature from me a few years ago. When I sold him the creature I warned him that in the next few years I might be stopping by to check on the creature's welfare. And I was glad to see that the creature looked happy and was adapting well to the laid back California life style.
All in all it was an interesting trip on the west coast. My first day back I got the bus stop robots back together again and back out on the porch. R2 was also worked on somewhat and hopefully will be rolling around again soon. While driving on the outskirts of San Francisco I passed a place that had some giant steel giraffes out front. More abstract than the one I'm building but still pretty cool. Made me want to get back and get mine finished. Hopefully that project should soon be getting back on track.

Showing posts with label bus stop robots. Show all posts
Showing posts with label bus stop robots. Show all posts
Sunday, May 2, 2010


Sunday, April 11, 2010
Robot tune-ups
 |
| Distressed Bus Stop Robots on the operating table |
It appears the poor bus stop robots look a little distressed laying on the work table but they're just in for their 2 year tune-up. And in that two years their robotics and sensors have worked just fine (and still do).
But it's the time of the year when pollen from the oak trees turns everything green so I brought them in to clean up and paint their bench a different more colorful color.
Two years and the vex robotic controller has been running almost constantly with no problems. Having them on the front porch has worked out very well. Sometimes we'll come home from work and there will be a flier in one of the robots hands. Instead of putting it on the door the solicitors sometimes put their fliers it in the robots hands which is very funny. Reactions to the bus stop robots on the porch are all over the place. Some (many) walk by them and act like they don't even see them. Others like them and will comment. And I imagine there's others that think they're pretty strange. Probably from the first group.
So I'll be cleaning them up and re-mounting them to the bench this week as well as working on R2. But 90% of my time the last 3 weeks has been yard work. In a few weeks I'll hopefully get back to Mr. Giraffe.
If you weren't around this blog 2 years ago I'll repost the youtube video of these robots:
Saturday, April 5, 2008
Friday, April 4, 2008
Robots on the porch waiting for a bus
Our son surprised us with a visit and a lot of people will be coming over so the robots were moved to the porch to greet them. A few things still need tweaking but they're working fine. Video to soon follow.
Done and sitting on the front porch !!

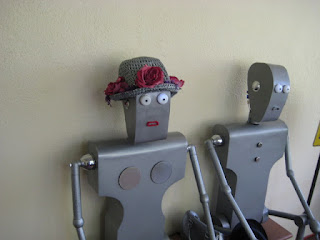

Done and sitting on the front porch !!


Wednesday, April 2, 2008
The Robotic purse
Thank God I have a wife to assist me in these excursions to Goodwill to pick out feminine robot apparal. No way am I secure enough to go purse shopping on my own.
The goal was to get a purse that can sit on the bench between the robots to hide the robotic controller and all the wire connections. We found the perfect size "Victoria Secrets" designer purse for $2.99. Why anyone would buy a purse like this in the first place is beyond me. Like a cruel joke. Victoria Secrets conjurs up images of apparel other than a purse with the words Victoria Secrets plastered all over it. So it's probably good that we turned this monstrosity into a silver robotic purse. It took the paint very well and fit perfect over the electronics.
Now originally I was going to mount all the electronics under the bench and build a compartment. But that would have involved a lot of crawling around and bending under the bench every time I have to check connections or make any changes. And anyone who builds this type of project knows that you're constantly tweaking and making changes. So instead of doing that on my back squinting in the shadows to see the controller it will be in plain view on top of the bench once the purse is removed.
Just a fine example of a couple user friendly robots.
The goal was to get a purse that can sit on the bench between the robots to hide the robotic controller and all the wire connections. We found the perfect size "Victoria Secrets" designer purse for $2.99. Why anyone would buy a purse like this in the first place is beyond me. Like a cruel joke. Victoria Secrets conjurs up images of apparel other than a purse with the words Victoria Secrets plastered all over it. So it's probably good that we turned this monstrosity into a silver robotic purse. It took the paint very well and fit perfect over the electronics.
Now originally I was going to mount all the electronics under the bench and build a compartment. But that would have involved a lot of crawling around and bending under the bench every time I have to check connections or make any changes. And anyone who builds this type of project knows that you're constantly tweaking and making changes. So instead of doing that on my back squinting in the shadows to see the controller it will be in plain view on top of the bench once the purse is removed.
Just a fine example of a couple user friendly robots.
Sunday, March 30, 2008
LED Earrings and external power supply problem
This weekend I worked like a dog on these bus stop robots. Finished just about everything down to LED earrings on Mrs. Robot. Drilled out eyes and made channels in the Styrofoam heads to run wiring harness's. I was going to share a digital channel to light LED's per head but decided to run each LED on it's own digital channel so I don't under power the lights.
A lot of soldering was accomplished and wiring harness's were run through the torso of the robot bodies and into an access area in the back. The wiring harness's and servo wires will hook to the controller which will sit between the two robots on the bench. My wife suggested creating a robotic purse with no bottom for the female robot. The purse will sit on top of the electronics which will make it easy for me to access and work on.
A couple of functions were added to the software to automatically turn eyes on and off as well as a wink function. I still need to choreograph some eye functions in the existing routines though.
One problem that's been dogging me for the last 2 weeks is using an external power supply for the controller. I use external power supplies on Robby and have done so on B9 with no problems. But on this project when I turn on the controller, it goes bezerk and then shuts down. I finally figured out the reason I can do it on Robby and B9 and not on the bus stop robots is because I'm using Servos and not regular motors which are in B9 and Robby. I don't understand why the difference between regular motors and servos but that's definitely the problem. And .... if I hook up only one servo it works. And .... if I turn it on with one servo and then plug in the second servo it also works. But if you turn the controller on with two servos it goes bezerk.
After hours and hours of trying different servos, different controllers, different wires, different voltage regulators and power supplies, etc. I finally decided to experiment dropping the voltage 1.3 volts. I'm using an adjustable voltage regulator with an LED readout of the voltage. When I dialed it down from 7.2 volts to 5.9 volts all of a sudden the problem was solved. Oh and something I neglected to say is it always worked with the vex batteries. So maybe the batteries aren't 7.2 volts after all. I also tried 6.1 and 6.2 and that seemed to work but what I know for sure is 7.2 is not liked by the vex controllers using servos.
This was figured out after dinner on Sunday and I still had to do a lot of frantic yardwork hanging over my head. So there just wasn't time to get any pictures or video of the robots yet. But our lawn looks nice.
Oh and one more feature I'm probably going to add is a wireless camera that may broadcast over the internet and record images. Kind of a like a robotic security system for the home. Too bad their legs don't walk because it would be even better if they could walk the perimeter. Phase II .....
A lot of soldering was accomplished and wiring harness's were run through the torso of the robot bodies and into an access area in the back. The wiring harness's and servo wires will hook to the controller which will sit between the two robots on the bench. My wife suggested creating a robotic purse with no bottom for the female robot. The purse will sit on top of the electronics which will make it easy for me to access and work on.
A couple of functions were added to the software to automatically turn eyes on and off as well as a wink function. I still need to choreograph some eye functions in the existing routines though.
One problem that's been dogging me for the last 2 weeks is using an external power supply for the controller. I use external power supplies on Robby and have done so on B9 with no problems. But on this project when I turn on the controller, it goes bezerk and then shuts down. I finally figured out the reason I can do it on Robby and B9 and not on the bus stop robots is because I'm using Servos and not regular motors which are in B9 and Robby. I don't understand why the difference between regular motors and servos but that's definitely the problem. And .... if I hook up only one servo it works. And .... if I turn it on with one servo and then plug in the second servo it also works. But if you turn the controller on with two servos it goes bezerk.
After hours and hours of trying different servos, different controllers, different wires, different voltage regulators and power supplies, etc. I finally decided to experiment dropping the voltage 1.3 volts. I'm using an adjustable voltage regulator with an LED readout of the voltage. When I dialed it down from 7.2 volts to 5.9 volts all of a sudden the problem was solved. Oh and something I neglected to say is it always worked with the vex batteries. So maybe the batteries aren't 7.2 volts after all. I also tried 6.1 and 6.2 and that seemed to work but what I know for sure is 7.2 is not liked by the vex controllers using servos.
This was figured out after dinner on Sunday and I still had to do a lot of frantic yardwork hanging over my head. So there just wasn't time to get any pictures or video of the robots yet. But our lawn looks nice.
Oh and one more feature I'm probably going to add is a wireless camera that may broadcast over the internet and record images. Kind of a like a robotic security system for the home. Too bad their legs don't walk because it would be even better if they could walk the perimeter. Phase II .....
Tuesday, March 25, 2008
Robotic breast augmentation
I apologize since the attached picture may appear somewhat unladylike .... even for a robot. But it was very necessary to get her into this position so the robotic boobs would set correctly. We sure wouldn't want one sagging on one side would we.
Hey, don't blame me ... I didn't design her and am just replicating the picture from the magazine. The stainless coasters I ordered from Target were dead on for this piece of delicate robot anatomy. Beautiful stainless to contrast against the hammered silver skin. She's beautiful !! I predict she will be quite popular around here with all the male robots competing for her attention. And that could very well spell trouble with a capital "T" unless I get the Rosie the Robot project back on track real soon.

Hey, don't blame me ... I didn't design her and am just replicating the picture from the magazine. The stainless coasters I ordered from Target were dead on for this piece of delicate robot anatomy. Beautiful stainless to contrast against the hammered silver skin. She's beautiful !! I predict she will be quite popular around here with all the male robots competing for her attention. And that could very well spell trouble with a capital "T" unless I get the Rosie the Robot project back on track real soon.

Sunday, March 23, 2008
The fun stuff at last
Something that comes fairly easy to me is software programming. So when I went about designing a system to control the bus stop robots, it was a lot of fun. After being a professional programmer for over 23 years, it's been pretty boring lately. But programming the vex controller with various routines and functions to control the bus stop robots has been a blast. Especially when the end result is seeing the robots come alive.
The only thing that was changed in the initial plan is to have the sensor aimed at the front door instead of toward the beginning of the walkway. The reason for this is I don't want the squirrels and vegetation movement to be constantly triggering the robots. So instead the sensors will be aimed at the front door. When someone comes to the door or when someone comes out of the house, the robots will activate.
In other breaking robot news, we took a quick trip to Orlando to pick up a bunch of really premium R2 parts from R2 guru Daniel D. The east coast Godfather of R2 builders. Some really nice parts were acquired and a few more will soon be on their way. His garage is full of cool robot and star wars items including a life size exact replica of the star wars land speeder (in the very first star wars movie). The land speeder drives and looks like it's floating. Too cool for words.
These Bus Stop Robots will finally be completed this week.
The only thing that was changed in the initial plan is to have the sensor aimed at the front door instead of toward the beginning of the walkway. The reason for this is I don't want the squirrels and vegetation movement to be constantly triggering the robots. So instead the sensors will be aimed at the front door. When someone comes to the door or when someone comes out of the house, the robots will activate.
In other breaking robot news, we took a quick trip to Orlando to pick up a bunch of really premium R2 parts from R2 guru Daniel D. The east coast Godfather of R2 builders. Some really nice parts were acquired and a few more will soon be on their way. His garage is full of cool robot and star wars items including a life size exact replica of the star wars land speeder (in the very first star wars movie). The land speeder drives and looks like it's floating. Too cool for words.
These Bus Stop Robots will finally be completed this week.
Friday, March 21, 2008
They are alive !!!
I had good Friday off so it was off to the garage. I really got into working on these robots today and much was accomplished. The mouths came out fantastic and the eyes also look beautiful. The ladies lips are red and the male's are silver. It really sets her off and that little amount of red adds a lot to the feel of the project. The hat was completely redone and is now a metallic silver. It took the paint with no problems.
But the red letter moment came when I fired up the neck servos and did some experimenting with the passive IR sensors that came in the mail today. The sensors were tested and they worked great. But the servos and the head movement .... now that was wonderful. Both of the robots were moving their heads and looking around and at each other. It worked flawlessly and looked cool as heck.
The only problems were with a new power supply that I tried to use for the robotic controller. For some reason that power supply kept shutting down the controller. But using battery power worked just fine. Minor details.
So the only thing left are the lady robot boobs (which are on order) and the lady robot ears. After that and a lot of computer programming we'll be able to check another couple robots off as done. I'll post pictures and video when I finish the boobs (which will be stainless coasters from Target).
And then it's onto several other robot projects in my never ending quest to build up a powerful robot army to take over the world.
But the red letter moment came when I fired up the neck servos and did some experimenting with the passive IR sensors that came in the mail today. The sensors were tested and they worked great. But the servos and the head movement .... now that was wonderful. Both of the robots were moving their heads and looking around and at each other. It worked flawlessly and looked cool as heck.
The only problems were with a new power supply that I tried to use for the robotic controller. For some reason that power supply kept shutting down the controller. But using battery power worked just fine. Minor details.
So the only thing left are the lady robot boobs (which are on order) and the lady robot ears. After that and a lot of computer programming we'll be able to check another couple robots off as done. I'll post pictures and video when I finish the boobs (which will be stainless coasters from Target).
And then it's onto several other robot projects in my never ending quest to build up a powerful robot army to take over the world.
Monday, March 17, 2008
Robot hats ?
Yes, that's right ... today's great robotic accomplishment was making a ladies robot hat.
I'll admit it felt very strange in Michael's craft shop picking out flowers and lace to make the hat. I always find a lot of great stuff at Michaels for my projects but today shopping for lace, frill and flowers was a change. But I got the stuff and then my wife helped me pick out a hat base at the Salvation Army. We went with a teal colored hat which is not exactly what is in the picture but the material was perfect and the price was even better. If I went with white it would have been impossible to keep clean outdoors.
Several eye experiments left me wondering if the eyes were going to be a tougher part of the project than I thought. Several designs have been made and discarded already. Goofy looking eyes make the robots look stupid.
Thoughts the next morning .... Maybe I'll spray paint the base of the hat silver or dye it .... not too crazy about that color.


I'll admit it felt very strange in Michael's craft shop picking out flowers and lace to make the hat. I always find a lot of great stuff at Michaels for my projects but today shopping for lace, frill and flowers was a change. But I got the stuff and then my wife helped me pick out a hat base at the Salvation Army. We went with a teal colored hat which is not exactly what is in the picture but the material was perfect and the price was even better. If I went with white it would have been impossible to keep clean outdoors.
Several eye experiments left me wondering if the eyes were going to be a tougher part of the project than I thought. Several designs have been made and discarded already. Goofy looking eyes make the robots look stupid.
Thoughts the next morning .... Maybe I'll spray paint the base of the hat silver or dye it .... not too crazy about that color.


Wednesday, March 12, 2008
Just two faceless robots waiting for a bus
I can't believe these two are almost ready to sit on the porch. Now I get to do the fun stuff .... programming the robotic controller and adding the face and head details for the robots. Ears should be pretty easy but I have about a dozen ideas for eyes and plan on taking my time in that area because it's so important. I'll use goop to attach the details to the head because it's easy to change your mind with goop.
I don't think the red works for the bus stop pole so that will probably be repainted. Oh and I got a good deal on an old fashioned men's hat on EBAY this week so there should be a hat resting on the male robot's knee very soon. And of course, the female boob-ettes and male buttons on the chest still need fabrication. Other than that, it's full speed ahead.

I don't think the red works for the bus stop pole so that will probably be repainted. Oh and I got a good deal on an old fashioned men's hat on EBAY this week so there should be a hat resting on the male robot's knee very soon. And of course, the female boob-ettes and male buttons on the chest still need fabrication. Other than that, it's full speed ahead.

Sunday, March 9, 2008
Just about done
So many loose ends were tied up and completed this weekend. The robots are almost done. For sure they will be done this month. The Legs had a lot of detail work done to them, heads were finished with styrene and laminated on all sides. They also were sanded and any cracks were filled. The weight of these heads are 17/20 oz as opposed to the old wood heads that weighed in at 46 oz. Even with these lighter heads, the shaft needed extra support so I mounted brackets and several axle holders to support the head shafts. And on the brackets necks were installed. Everything just came together today.
I bought a yellow vintage bus stop sign (a little different than the original artwork) from EBAY and the stand is just about finished. The sign's base is from a fan we had that broke last year. It was my wife's idea to use this for the sign last year so I can't take the credit.
The epoxy that held the gear onto the base of the heads didn't hold much to my surprise. It broke off and was slightly sticky underneath despite the fact the top of the epoxy was hard as a rock. Someone suggested that maybe I didn't mix the epoxy enough. Also I think I should have roughed up the surfaces a little to give the glue something to hold. So I made two new gear covers and used a plastic welder to fuse them together. I also drizzled epoxy on all contact points between the gear and connector. They are now permanently fused !
Busy day ... no time for pictures. They both look cool with their heads on.

I bought a yellow vintage bus stop sign (a little different than the original artwork) from EBAY and the stand is just about finished. The sign's base is from a fan we had that broke last year. It was my wife's idea to use this for the sign last year so I can't take the credit.
The epoxy that held the gear onto the base of the heads didn't hold much to my surprise. It broke off and was slightly sticky underneath despite the fact the top of the epoxy was hard as a rock. Someone suggested that maybe I didn't mix the epoxy enough. Also I think I should have roughed up the surfaces a little to give the glue something to hold. So I made two new gear covers and used a plastic welder to fuse them together. I also drizzled epoxy on all contact points between the gear and connector. They are now permanently fused !
Busy day ... no time for pictures. They both look cool with their heads on.

Saturday, March 8, 2008
Passionate builders
Last night Charlie G. and Greg from the B9 club stopped by after flying into Orlando from out west. They certainly picked the worst time of the year, the worst time of the day and the worst weather we've had in a long time to make their way from Orlando. Despite hours of driving in torrential rain and wind with traffic accidents everywhere they finally made it safe and sound.
It's nice talking with other insane people who have the same crazy ideas and have patient wives who put up with it all. We were talking about it a little yesterday and the word is passionate. People who are passionate about what they do ... also translated means FUN. There's a lot of people who start robot projects but their reasons and motivation get in the way of the build and after a period of time they abandon their projects. Of course certain things tend do get in the way (finances, relationships, jobs etc.) of the robot projects. But it was nice to discuss build techniques and robots in general. And I'm sure there's a few people out there in blogland that are shaking their heads right about now but that's what makes the world go round.
Before they came over, I opened a bunch of boxes I've had for months with R2 parts I had ordered. So it kind of kicked off the R2 build I guess. Charlie is also ready to start his R2 when he also gets his aluminum frame and Greg is just starting to get interested in an R2 project.
In Bus Stop robot news .... Today I covered the sides of the heads with styrene. The faces came out good. Charlie gave me a tip how to anchor the bracket on a little better with special wide drywall anchors which work with styrafoam. Notice the picture below of the hands. I used hot glue and after it dries, a dremmel with round stone attachment. It somewhat simulates welds on the hands and it's very easy to use.
Below - Greg, Charlie and myself


It's nice talking with other insane people who have the same crazy ideas and have patient wives who put up with it all. We were talking about it a little yesterday and the word is passionate. People who are passionate about what they do ... also translated means FUN. There's a lot of people who start robot projects but their reasons and motivation get in the way of the build and after a period of time they abandon their projects. Of course certain things tend do get in the way (finances, relationships, jobs etc.) of the robot projects. But it was nice to discuss build techniques and robots in general. And I'm sure there's a few people out there in blogland that are shaking their heads right about now but that's what makes the world go round.
Before they came over, I opened a bunch of boxes I've had for months with R2 parts I had ordered. So it kind of kicked off the R2 build I guess. Charlie is also ready to start his R2 when he also gets his aluminum frame and Greg is just starting to get interested in an R2 project.
In Bus Stop robot news .... Today I covered the sides of the heads with styrene. The faces came out good. Charlie gave me a tip how to anchor the bracket on a little better with special wide drywall anchors which work with styrafoam. Notice the picture below of the hands. I used hot glue and after it dries, a dremmel with round stone attachment. It somewhat simulates welds on the hands and it's very easy to use.
Below - Greg, Charlie and myself


Thursday, March 6, 2008
Hands and fingers done
Last night I made a concentrated effort to finish the arms, hands and fingers of the BSR's. While painting the hands, I decided to dedicated this blog entry to Brad Carpenter who was my spray painting (with hammered silver) mentor. There is definately a trick to using hammered and last night as I was laying it on thick (but not too thick) to get the smooth hammered look I thought about Brad.
Brad also built a B9 and has a lot of cool robot / scifi projects ongoing. But the ultimate will be his life size borg standing in one of those rejuvenation units (can't remember the term ... alcove?) I just wish he would have picked seven of nine instead of using Picard but that will still look very cool.
Last night I also finished fabricating the mechanism that will attach the heads to the motors. Now all I have to do is finish the heads and add the robo-boobs to the female robot. Then some final paint and program the servos and sensors. Getting close on those BSR's ... it looks like bad weather this weekend so maybe it there will be a lot of robot building.
Oh and several robot celebrities are stopping over tomorrow. Charlie and Greg from the B9 club are going to stop by Friday before heading over to Orlando and MegaCon. Geez ... now I need to clean up this mess of a garage and dust off the robots !
Brad also built a B9 and has a lot of cool robot / scifi projects ongoing. But the ultimate will be his life size borg standing in one of those rejuvenation units (can't remember the term ... alcove?) I just wish he would have picked seven of nine instead of using Picard but that will still look very cool.
Last night I also finished fabricating the mechanism that will attach the heads to the motors. Now all I have to do is finish the heads and add the robo-boobs to the female robot. Then some final paint and program the servos and sensors. Getting close on those BSR's ... it looks like bad weather this weekend so maybe it there will be a lot of robot building.
Oh and several robot celebrities are stopping over tomorrow. Charlie and Greg from the B9 club are going to stop by Friday before heading over to Orlando and MegaCon. Geez ... now I need to clean up this mess of a garage and dust off the robots !
Sunday, March 2, 2008
Hands and elbows
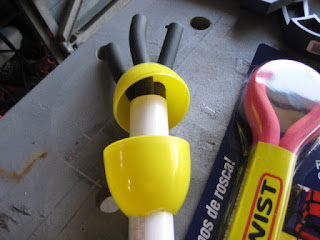
80 degrees and wind made nice sailing weather but I was still able to get in some progress toward the Bus Stop Robots. Dozens of ideas were considered how to make hands with fingers. Since we're using Easter Eggs, I bought the large eggs and used those for the base of the hands. Then I bought a few packages of Kwik Twists which were what were used for Bender's fingers inside the glove. Lightweight, pose able and easy to work with. Elbows were glued, painted and hung out to dry. They look great.
I was hoping to work more with the heads but when I get all four hands complete I'll move onto the heads. In all fairness, I have to say this project is time consuming because I'm actually building two lifesize robots. And they take twice as much time as one.



I was hoping to work more with the heads but when I get all four hands complete I'll move onto the heads. In all fairness, I have to say this project is time consuming because I'm actually building two lifesize robots. And they take twice as much time as one.


Saturday, March 1, 2008
Visualize the Goal

It's been a long time since I posted a picture of what I'm looking to do with these bus stop robots. So I scanned the magazine to create a better picture of what I'm trying to accomplish. The robot artist, Virgil Finlay, has created many pictures of these robots for various sci fi magazines. This particular magazine came out in August of 1958.
With the blessing of my wonderful wife, these robots will soon be sitting on the front porch complete with the Bus Stop sign and luggage. Fortunately my front porch is sheltered from the street and sidewalk with a jungle. Sensors in the robots will activate the heads to turn and look at who's approaching the front door. That's what's been taking so long .... making lightweight heads that can be driven by the installed vex motors.
Our poor mail lady ...
Thursday, February 28, 2008
Robots and the Easter Bunny
So what does the Easter Bunny and the bus stop robots have in common? Easter eggs of course ... just look at the new robot elbows and hands.
In another burst of creative inspiration, I got some of those plastic easter eggs and cut them on the band saw to fit over the joints of the bus stop robot arms. They also will make good wrists or the basis of hands if I can find some good fingers. These bots are getting finished or else !
And yesterday I got that epoxy resin that Mike mentioned and I painted a coat on after thickening it up with the microballoons. That stuff seems to work excellent. I'm not sure how many coats I'll need or how it's going to sand but I think it's a winner. Much better than that plaster stuff I was putting over the styrofoam.
I got a couple more R2 parts and am really starting to get pumped about hitting the R2 project hard around mid March when my frame gets shipped. Once I have that, then R2D2 will be up and running around our house in no time. C3PO will be very glad.


In another burst of creative inspiration, I got some of those plastic easter eggs and cut them on the band saw to fit over the joints of the bus stop robot arms. They also will make good wrists or the basis of hands if I can find some good fingers. These bots are getting finished or else !
And yesterday I got that epoxy resin that Mike mentioned and I painted a coat on after thickening it up with the microballoons. That stuff seems to work excellent. I'm not sure how many coats I'll need or how it's going to sand but I think it's a winner. Much better than that plaster stuff I was putting over the styrofoam.
I got a couple more R2 parts and am really starting to get pumped about hitting the R2 project hard around mid March when my frame gets shipped. Once I have that, then R2D2 will be up and running around our house in no time. C3PO will be very glad.


Sunday, February 24, 2008
Bus Stop robot arms
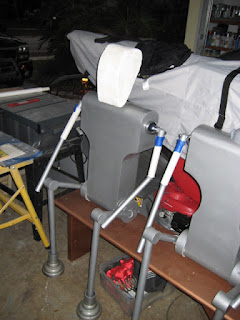
At the pace I've been going lately, today is a banner day for Bus Stop robot building. I was able to attach the arms decently where I can unbolt them easily if I need to work on the robot or for transport. Over the past couple months, I've considered all sorts of ways to attach the arms but kept running into dead ends because of the way I designed that area.
But FINALLY on Saturday I was blessed with bad weather and storms so I opted to stay in the garage instead of going out on the Sailboat/Kayak. And that's when the brainstorm hit ! I also came up with an idea to make the robot a little more realistic by beefing up the upper arms by sliding an extra piece of pvc over the arm up to the elbow joint. Looks less like pvc and more like an arm. And down by the feet, I added a few extra pieces of wide pvc to give the "Shoes" a little different look (to look less like a plunger).
There's still a lot of things to work out (hands for one) and I'm still hoping the heads turn out ok. But it's some progress. I need to get these complete to make way for R2 very soon.
Also this weekend my friend and I finished joining her 4 poplar pieces of wood and cut out a custom desk top. I have to say using the biscuit joiner went very smooth. After sanding it down, it looked beautiful. She was very proud of the work we did and we both learned a lot. The project was a success. It's nice making stuff.
But FINALLY on Saturday I was blessed with bad weather and storms so I opted to stay in the garage instead of going out on the Sailboat/Kayak. And that's when the brainstorm hit ! I also came up with an idea to make the robot a little more realistic by beefing up the upper arms by sliding an extra piece of pvc over the arm up to the elbow joint. Looks less like pvc and more like an arm. And down by the feet, I added a few extra pieces of wide pvc to give the "Shoes" a little different look (to look less like a plunger).
There's still a lot of things to work out (hands for one) and I'm still hoping the heads turn out ok. But it's some progress. I need to get these complete to make way for R2 very soon.
Also this weekend my friend and I finished joining her 4 poplar pieces of wood and cut out a custom desk top. I have to say using the biscuit joiner went very smooth. After sanding it down, it looked beautiful. She was very proud of the work we did and we both learned a lot. The project was a success. It's nice making stuff.

Thursday, February 21, 2008
Why it pays to blog
Working with foam is completely new to me. I started working with it kind of blindly figuring that I would learn as I go. And so far, I found it has been a good way to fabricate/sculpt objects inexpensively. The challenge so far has been to lay on a hard sandable coating over the foam.
My last blog entry mentioned that I melted the foam using some simple marine gelcoat I purchased at the local marine store. I thought I had sealed the foam good enough but it still was able to affect the underlying foam and melt it.
So this morning I found in my comments section some excellent tips from Mike about using epoxy resin and microballoons to thicken it. Mike btw has previously offered other helpful hints in the comment section. So armed with this latest tip and google, I opened up a whole bunch of doors to sculpting with styrofoam and coatings. I found a pretty good small company that you can ask questions (http://www.jgreer.com/) and then ordered some epoxy and microballoons (which they call something else). I sometimes prefer dealing with smaller companies.
So next week I'll re-address coating the bus stop robot heads with resin.
Thanks Mike !
My last blog entry mentioned that I melted the foam using some simple marine gelcoat I purchased at the local marine store. I thought I had sealed the foam good enough but it still was able to affect the underlying foam and melt it.
So this morning I found in my comments section some excellent tips from Mike about using epoxy resin and microballoons to thicken it. Mike btw has previously offered other helpful hints in the comment section. So armed with this latest tip and google, I opened up a whole bunch of doors to sculpting with styrofoam and coatings. I found a pretty good small company that you can ask questions (http://www.jgreer.com/) and then ordered some epoxy and microballoons (which they call something else). I sometimes prefer dealing with smaller companies.
So next week I'll re-address coating the bus stop robot heads with resin.
Thanks Mike !
Wednesday, February 20, 2008
Head melting
Covering the styfofoam heads with the hardner and then filling in the cracks is very time consuming. The hardner is like plaster (maybe that's all it is). So glooping it on the heads and then sanding it off ultimately makes thin spots over the foam.
So last night I was looking at the bus stop robot heads and considered the many hours needed to get them into a state where they could be painted and look good. And then I impulsively I went out and purchased a can of gelcoat to experiment. I wanted to see what gelcoat would do over the plaster and if it would fill in a lot of the imperfections. I reasoned I could paint a little gelcoat on the backside of one of the heads.
Well, by acting on my impulse and not thinking this through, I ended up with a couple ugly holes that were melted in the back of the head where the plaster was thin or a crack where the gelcoat could leak through to melt the styrofoam. Kind of a mess but the head is still usable. What I should have done is painted the heads with a latex paint first. I think that may have sealed it better so the gelcoat wouldn't react to the styrofoam. Ahhhhh yes another lesson in building.
So last night I was looking at the bus stop robot heads and considered the many hours needed to get them into a state where they could be painted and look good. And then I impulsively I went out and purchased a can of gelcoat to experiment. I wanted to see what gelcoat would do over the plaster and if it would fill in a lot of the imperfections. I reasoned I could paint a little gelcoat on the backside of one of the heads.
Well, by acting on my impulse and not thinking this through, I ended up with a couple ugly holes that were melted in the back of the head where the plaster was thin or a crack where the gelcoat could leak through to melt the styrofoam. Kind of a mess but the head is still usable. What I should have done is painted the heads with a latex paint first. I think that may have sealed it better so the gelcoat wouldn't react to the styrofoam. Ahhhhh yes another lesson in building.
Subscribe to:
Posts (Atom)