Contact me

Sunday, May 4, 2008

Singing the R2 blues ...

Didn't get much building in yesterday but did start the process of painting some of the parts in the R2 blue. I'm getting ready to get going on the dome and wanted to start with the blue painting to gauge if I'm going to have enough paint. So I prepped the radar eye, large data port, dome ring and utility arms.

The radar eye is a piece of shiny aluminum art. But it had to be blue so I prepped it by scruffing it up real good with a fine foam sanding pad. I actually did that with all the parts except for the utility arms which didn't need it.

Then the parts were cleaned with acetone and then shot with a coat of aluminum self etching primer (sherwin williams GBP 988 self etching primer).

After the parts are primed I'm using a blend of paint that BLACK GOLD INC. out of Arlington TX sells. They make the same color combo that was used by the R2 in some of the star wars movies I believe. You first use a custom base coat (it's a purple) SKU# R2D2 which is 2 parts FBC10 1 FBC02 and 1 FBC12. After applying the base coat you then use Kandy Oriental blue spray SKU# K04S. BLACK GOLD INC.'s phone# is 817-633-1135 or 817-640-4653 if you're interested. I bought 2 cans of base and 3 topcoat kandy. Not sure if that's going to be enough but it should be close.

Later in the day I applied the purple base coat to the parts and then several coats of the blue. Looks beautiful too. And then ... I have to admit. Sometimes building these robots is so frustrating. No matter how hard you try, something manages to screw up. And it's usually going to happen to the most critical areas. Today my "SUOTD" involved the radar eye. After it was done and looked spectacular in it's new blue color, I decided to turn it upside down and paint the inside ring a little more but from the bottom angle. Bad idea. The radar eye turned while I was shooting paint and smeared paint on the front. So all I can do is sand it down and redo it. And that's frustrating beyond frustrating. Enough painting for today .... and I really am singing the blues now.

NOTE: I couldn't stop and ended up wet sanding the radar eye area that was bad. Then I applied some base coat and then did the top coat again. And it's looking good again. Now if I can keep my paws off these parts for a few hours they may just turn out fine.


Tuesday, April 29, 2008

Shoulder hubs and details.

The shoulder hubs were assembled and glued today and detail pieces that go on the horseshoes were applied. And one of the mysteries of the universe was revealed when I dropped the shoulder hub into the indentation on the leg and slid the horseshoe into place. For the last year or so I wondered how to attach the hub to the shoulder. It was so simple ... The horseshoe holds it in place !

And another lightbulb turned on when I re-mounted the legs to the frame. Now I understand why it's not good to attach the booster covers with long screws from the outside of the leg. Because you really should have the boosters off to get an allen wrench on the one leg/frame bolt that's under the boosters. I'm sure I'll be able to tighten it using another method but it will complicate things slightly.

Progress on R2 is going a lot faster than expected.

Bender pics

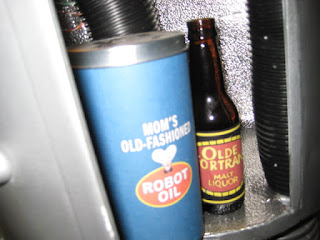
Today I was asked about our Bender robot and I thought I had posted some pictures of him on the blog after he was upgraded last June. That happened just before a terrible event in our life so I never did go back and upload pictures on the blog. So I snapped a few tonight and uploaded them. I even added a picture of Bender's "Olde Fortran Beer" and the can of "Mom's Old Fashioned Robot Oil" in his chest compartment.

The only plans I had were a small 6" statue I bought of Bender and I measured some of the parts and tried to calculate how to scale the dimensions proportionately. Mostly was just eyeballed though. I still have the original drawing which was done on a napkin.

Better late than never.


Sunday, April 27, 2008

Making it fit (or at least trying very hard)

Today was one of those days that snowballed in mistakes and recovering from them. I started off all fresh and confident that I would be able to recut keyholes in the legs to mount the boosters. I measured marked, made several templates and once I determined the places to cut, I even used a punch to make a precise area where my drill bit would start cutting (using my nice new drill press). Also created a template of the boosters and laid it over the legs to visualize the booster location.

But the most important thing of all went right over my head. So obvious and so stupid that I hate admitting it in public like this. I FORGOT to compensate for the boosters being pushed downward on the keyhole. And that makes all the difference in the world. So where I cut the holes was too low unless I salvaged my mistake and used that location as the absolute location of the boosters (no sliding downward on a keyhole. I doubt I'm the first person to do this and I doubt many people will notice so I simply drilled the hole directly through the leg and used 2" flat head countersunk to attach the boosters using only the middle two booster threads. That's really all that's needed as they're not going to be under any stress. And they both look beautiful. So I compromised a little but so what and it works just fine. I also finished tapping the holes for the other shoulder shims. so horseshoes, boosters, and shims are ready to go.

Towards the end of the day I started getting tired so mistakes began multiplying at a exonential pace. After drawing blood the realization came that it was time to close up the garage and call it a day. Yeah, call it a fun day.

Saturday, April 26, 2008

Legs, center ankle and nothing lining up

I modified the JAG battery plate/center ankle mount today to work with the custom ankle mount I created about a year ago. My design allows you to remove the center ankle/foot with one pin. I wasn't sure it would work with the JAG frame until I built the frame yesterday. I'll need to build a new aluminum frame mount but it will work. I'll take some pictures when it's finished. By removing the JAG ankle mount, I was able to lower the battery about 1/2" which brings the cg down just a tad. Every bit helps. My battery fits on the mount perfect.

Many things aren't lining up today so I find myself going to plan "B" a lot. Ryan's legs do not even come close to matching Daniel's booster covers. I'll need to drill new keyholes in the legs. Also Daniel's data port only works with the jag frame in the center hole on the data port. Which is probably ok. I could even glue it on the sides as it's not a stress object. And I heard from a few guys that Daniel's frame skin blocks are a little tight with the JAG frame so there's going to be a run of new blocks designed by Jerry.

So being the chicken that I am, I will measure a thousand times and build templates to simulate the drilling into the legs so I don't ruin them. I never created a keyhole before so that ought to be interesting.

Friday, April 25, 2008

Droid elves in the night?

Anyone who saw my pile of parts yesterday and then witnessed the shiny new droid in the garage would think that there were a bunch of droid elves busy throughout the night.

Not quite the case ... it's just that I have this terrible cold and when I woke up, I decided to call in to work so I could sleep a little later. When I woke up, I felt a little better and felt like going out to the garage to "look" at the new frame parts. And one thing led to another and then to another and before I knew it there was a beautiful little R2 unit sitting on the bench.

Jerry's JAG frame instructions were great and this is coming from a guy who hates reading instructions. He even marked (so people don't screw up the rings) where to correctly countersink the holes for screws. Because if you countersunk them on the wrong side then there wouldn't be enough material to do it on the correct side.

I took my time and even decided to sand the frame with my portable palm sander before assembly. Jerry recommends using 100 grit and then 150 grit but I just did mine at 100 and let it go at that. Looks shiny and clean and I don't plan on entering it in a beauty contest so good enough. The hardest part was playing with the legs and getting the correct angles on both sides. I think I got it right. Daniel D.'s large data port doesn't seem to fit right on the frame so I'm probably going to have to make some modifications there.

When I was done and I stepped back to admire the days work, I have to say it's beautiful. This is where I transition from parts collecting to putting it all together.

Thursday, April 24, 2008

JAG Aluminum R2 Frame arrives

It is a glorious day around here as the coveted and long awaited JAG Aluminum R2 frame arrives via the UPS Man. Jerry Greene packaged it up beautifully and his craftsmanship is the best. I soon realized when I started this project that I had to have a solid aluminum base for my project. The other frames work great but I wanted aluminum.

Unfortunately the next couple months are really busy for us and I won't have a heck of a lot of build time free. But come July and August when it's about 150 degrees in the garage I'll have plenty of time. Actually it's not that bad ... I have a good ceiling fan and mornings are good.

The build time for the frame looks pretty minimal. I'm thinking about sanding it before assembly so it looks good. Why not.


Wednesday, April 23, 2008

Venting ...

So I take it you were expecting a rant or something from the title of this entry. No such luck. Today's topic is venting but more like Center Venting. R2D2's Center Vents (the vents in the middle of his "chest").

I picked up a vent kit from another builder about a month ago and spent a lot of time working on them. They needed a lot ... and I mean a lot .... of filing and sanding to get them into the correct shape to fit into the outer aluminum cases. Pardon the terminology ... I still don't know what to call those outer things.

These vents (I'm told by an experienced R2'er) are often the object of children's curious fingers and will be poked and prodded. So they need to be securely put together ... or as secure as possible. Some guys are using metal tape, hot glue and other ways of putting them together. And I understand because they are difficult to hold and glue so the tape makes sense in that respect. But I was able to get some epoxy on them and maybe later I'll lay on a layer of hot glue to build up a protective cushion around the backside of the vents so they don't get poked out by curious children or gorgeous ladies trying to grab the attention of handsome robot builders.

Friday, April 18, 2008

R2D2 Droid hauler

Harbor Freight is a great tool store where I can frequently be seen wandering the aisles. They have everything, usually at reasonable prices and decent quality.

Something I've been thinking about for awhile is to come up with a way to get robots into and out of a pickup truck without killing myself. These robots can be very heavy and R2 will be around 300 pounds. As I plan on taking R2 out more than the other robots, it's been on my mind to come up with a technique for moving him. I considered the wheelchair lifts but they can get pricey. I've browsed the harbor freight catalogs and their online store in the past to see if they had something that would work. But the catalog that came this week had a perfect solution. Their 12 volt winch powered hitch lift made for pickup trucks. It's $199.00 and a 15% off coupon brought the price down to $170.00 which isn't too bad. Here's the link to the item in case anyone is interested. I'll build a crate for R2 that he can ride in to keep him out of the weather.

In other workshop news, last couple months my new workshop assistant has been all to frequently been putting the hustle on me for peanuts. I can't resist as I am a sucker for a furry face.

Sunday, April 13, 2008

Spiders crapping on my dome prompt massacre

R2's dome has been safely stored on a top shelf in the corner of my garage. Well ... I thought safe. Never expected spiders to be detrimental to the dome. Lately I have just let the spiders hang out in my garage because they really didn't bother me even though I particularly do not like spiders.

So when I retrieved my dome from where it was sitting the last 6 months, I noticed a bunch of small black bumps all over the top of the dome. Right under where several spiders were living ! Now it wouldn't be so bad if I could have just cleaned it off. Only this stuff was like the spiders were crapping black epoxy. Even with steel wool it's proving to be difficult to remove. I take this as an act of war and the spiders drawing first blood. So by the end of the day I predict the spider population will be dramatically decreased around here.

But the really really good news is that http://Astromech.net is back online and completely redesigned. For anyone interested in building an R2 joining astromech.net is a definite MUST.

Today I found a great tip on astromech.net with a picture suggesting where to trim aluminum skins to accommodate the utility arms without binding. So they were trimmed today with my handy dremmel. I also cleaned up the skins and using steel wool and a file to remove remnants of the gorilla glue that I used (not recommended) to laminate the skins. Today some of the skin inserts will also be glued to the skins where opening panels are not necessary. Probably will only have several panels with hinges on the skins and dome.

Oh and we're back early from the Disney trip. All I'll say is it didn't turn out well and I went from being "Mr. sensitive guy" to residing in the doghouse in an instant.


Friday, April 11, 2008

R2D2 project is now active

The R2 project has officially begun. The last couple days I've been digging out parts that I've been collecting over the past two years. There were a few duplicate parts so there will probably be an R2 garage sale after my friend Brad takes what he needs. Plus I found a few parts that I thought I still needed to purchase already in my R2 treasure chest. Almost every part is accounted for and 90% of them are aluminum.

As I'm going to be doing some fabrication of motor brackets and a few other things, I finally broke down and bought a new drill press. Something I've needed for awhile but didn't want to sacrifice any bench space. And that was the problem yesterday when I brought it home. I had to dismantle part of my work bench to come up with a way to mount the drill press as I had to get a rather large 12" model. It took awhile but it's looking pretty darned cool in my workshop. A drill press isn't something you use a lot so that's why it took so long for me to go out and replace the one I had.

Being the sensitive guy I am, I realize that the coming months will subject my poor wife into being a robot widow once again. So this weekend we're going to Disney world and staying at one of the resorts. And I've been warned about a hundred times not to complain and crab when we're fighting the crowds and dealing with general Disney madness. I do tend to crab about being there a little much but we've only been there about a thousand times. However what makes her happy makes me happy ..and if I'm good, she said we can go on Star Tours at MGM and see the droids !

A plan is forming in my brain how to mount the motors to the feet and ankles. The plan is starting to gel but it's not something you want to rush ... especially since it involves cutting parts.

Now I'm getting excited about this project. Too @%#@ bad I have to go to @%## Disney @%# World @%^#@5@%# this @%#@# weekend.
(( Just kidding. )))


Friday, April 4, 2008

Robots on the porch waiting for a bus

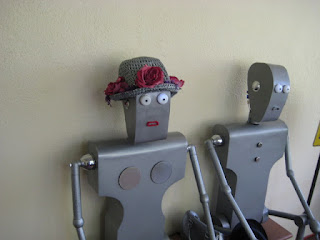
Our son surprised us with a visit and a lot of people will be coming over so the robots were moved to the porch to greet them. A few things still need tweaking but they're working fine. Video to soon follow.

Done and sitting on the front porch !!


Wednesday, April 2, 2008

The Robotic purse

Thank God I have a wife to assist me in these excursions to Goodwill to pick out feminine robot apparal. No way am I secure enough to go purse shopping on my own.

The goal was to get a purse that can sit on the bench between the robots to hide the robotic controller and all the wire connections. We found the perfect size "Victoria Secrets" designer purse for $2.99. Why anyone would buy a purse like this in the first place is beyond me. Like a cruel joke. Victoria Secrets conjurs up images of apparel other than a purse with the words Victoria Secrets plastered all over it. So it's probably good that we turned this monstrosity into a silver robotic purse. It took the paint very well and fit perfect over the electronics.

Now originally I was going to mount all the electronics under the bench and build a compartment. But that would have involved a lot of crawling around and bending under the bench every time I have to check connections or make any changes. And anyone who builds this type of project knows that you're constantly tweaking and making changes. So instead of doing that on my back squinting in the shadows to see the controller it will be in plain view on top of the bench once the purse is removed.

Just a fine example of a couple user friendly robots.